
When we first introduced our Rome Collection in sizes 0-20, we added C and D cup options to Cielo in PDF format to make it as easy as possible for you to do what we call in the biz a “full bust adjustment”. Since we just launched extended sizing for the Rome collection (drafted for a curvier shape with a D cup base as we explained here), we realized it would be a good idea to show how to do it the other way around!
A “small bust adjustment” is basically the exact opposite of the FBA. If you fall in our new 14-30 size range but don’t have a larger bust, you may find you need less volume in the chest than our drafting convention, and this is the pattern modification you’ll need to get the best fit! In this post, our pattern maker Celine is going to show you how to achieve an SBA by adjusting the dart in the Cielo top and Sienna Maker Jacket. As darts provide 3d shaping, the principle would be the same for any pattern where you need less volume. If you are someone that frequently needs to make this adjustment you can try some of these different methods and choose one that works for you. Take it away Celine!
UNDERSTANDING CUP SIZES
Just a little pattern lingo refresher: cup sizes in drafting terms has nothing to do with bra cup sizes. Rather, it’s the difference in inches between high bust and full bust. Every inch difference equals a cup size. Our 0-20 size range is drafted for a B cup, meaning a 2″ difference between high and full bust. Our 14-30 size range is drafted for a D cup, meaning a 4″ difference between full and high bust. If you have a smaller cup size (1″ difference = A cup, 2″ difference = B cup, 3″ difference = C cup) you may want to adjust our 14-30 range with an SBA to reduce some of that bust volume. I’ll show you a few different methods below.
One note: we include a “general” apex mark on most of our bodice pieces. However, the apex will be a bit different for everyone. To find your apex, hold the pattern piece to your body, lining up center front to the center of your body. Mark the fullest part of your bust on the pattern piece.
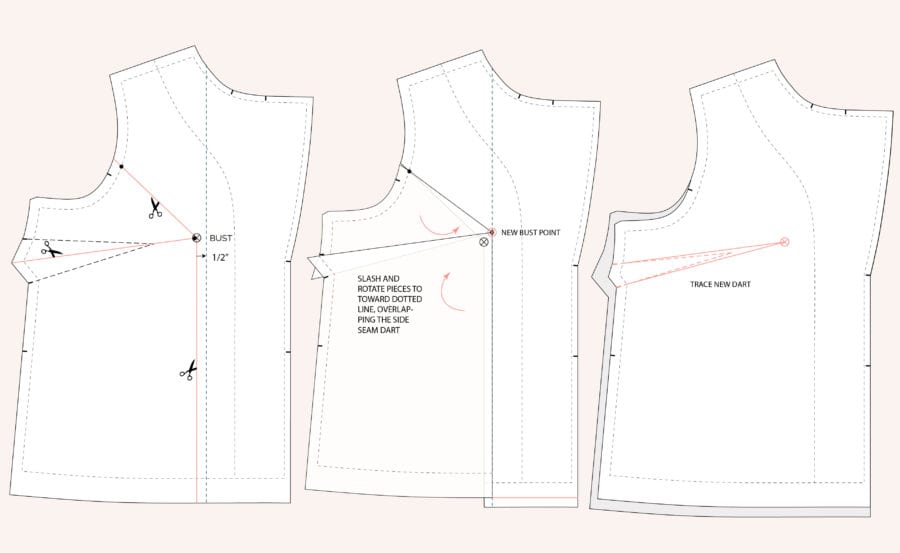
SMALL BUST ADJUSTMENT ON ARMSCYE DARTS
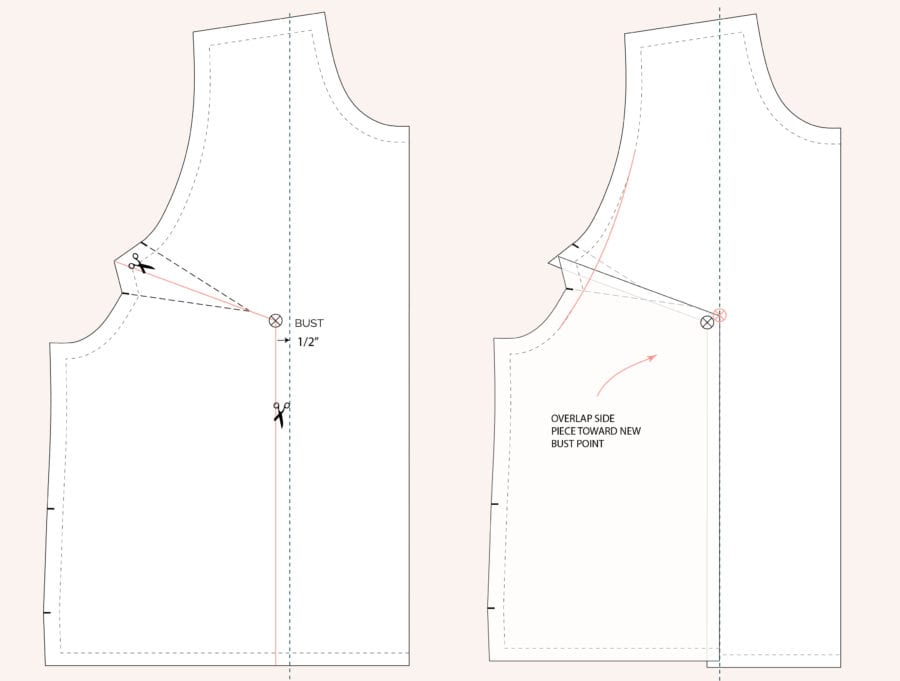
Trace a line in the middle of the armhole dart to the apex and another one from apex to hem, parallel to center front. Next, trace a reference line parallel to the bust apex vertical line, closer to center front. The space between the lines depends on how much width you need to remove. In this case, I’m removing 1″ total, moving from a D to a C cup, so on this half o the pattern piece, we’ll be removing 1/2″ inch (the other 1/2″ will be removed from the mirrored side). Mark the apex on this new reference line, at the same level as the existing apex.
Next, slash through the lines meeting at the apex. Slide the side piece over, matching the new apex and closing part of the dart. Draw your new bust point and new dart legs. Your bust dart should be narrower and the front has less width. You’ll need to “true” or blend your new armscye, side seam and hem. If the bust point doesn’t end up at the right place after doing the SBA, you can rotate it to the right place or lengthen or shorten it. We wrote an in-depth dart fitting post here that explains how to make those modifications.
If you are doing an SBA on a bodice with no darts, you would follow the same steps, although you won’t have to worry about truing the dart area.
KEEPING IT LOOSE BUT NARROWING DART
If you have too much shaping at the bust area but don’t want to lose that loose fit, make a smaller dart!
Trace dart legs that extend to the bust point and another line from apex to hem, parallel to Center Front. Trace your side seam on another piece of paper with the same seam allowance. Slash and close the dart by rotating the side piece that was cut out and tape in place. Copy the side seam and trace the new hem (which can be straight or curved if you want to keep the same Center Front length).
SBA WITH A SIDE SEAM DART
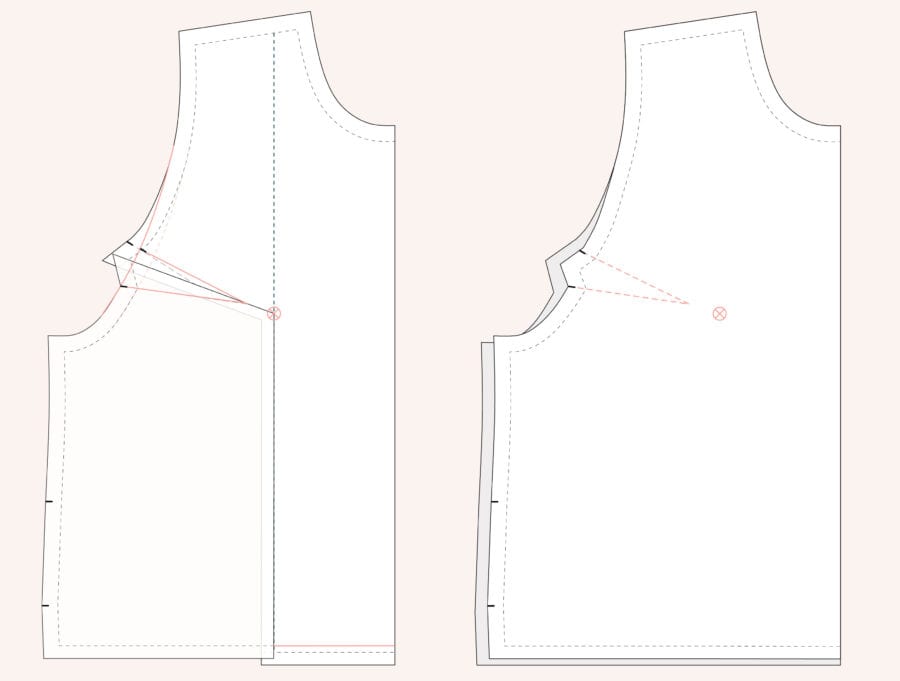
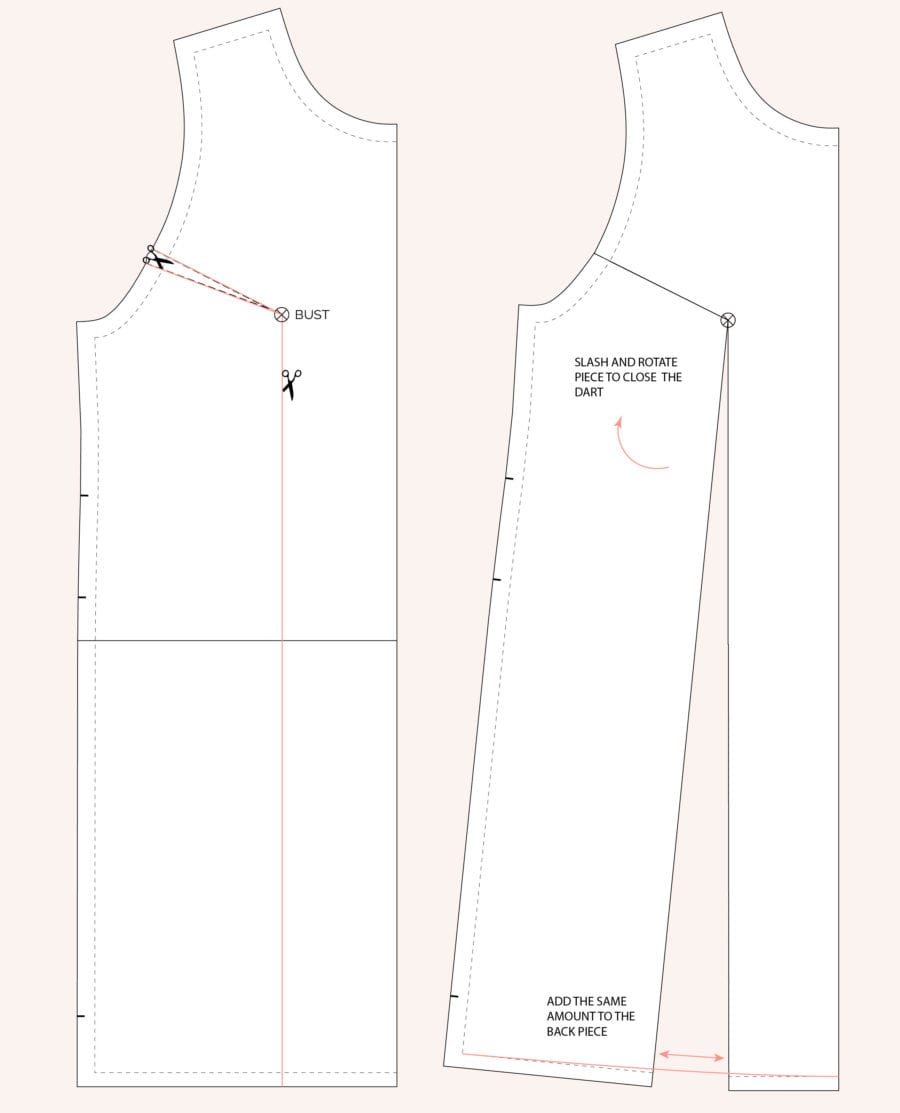
Our Sienna Maker Jacket (14-30 size range) has a bust dart that goes into the side seam as opposed to the armhole. This is an easy thing to change too.
Trace a line in the middle of the side dart to the apex, trace another one from apex to hem (parallel to Center Front) and one from the middle of the armhole to the apex. Cut from the hem to the armhole, not cutting through the seam allowance of the armhole so you can rotate it properly. Cut on the dart line until just before the apex. Rotate pieces so they overlap toward the reference line (as with the last SBA, we are reducing the Front by 1” altogether), so the line is 1/2” from the original bust point. By doing so, the dart has been made smaller. Draw your new bust point and new dart legs. You can redraw your armhole if it has been distorted.
REMOVING THE DART ALTOGETHER

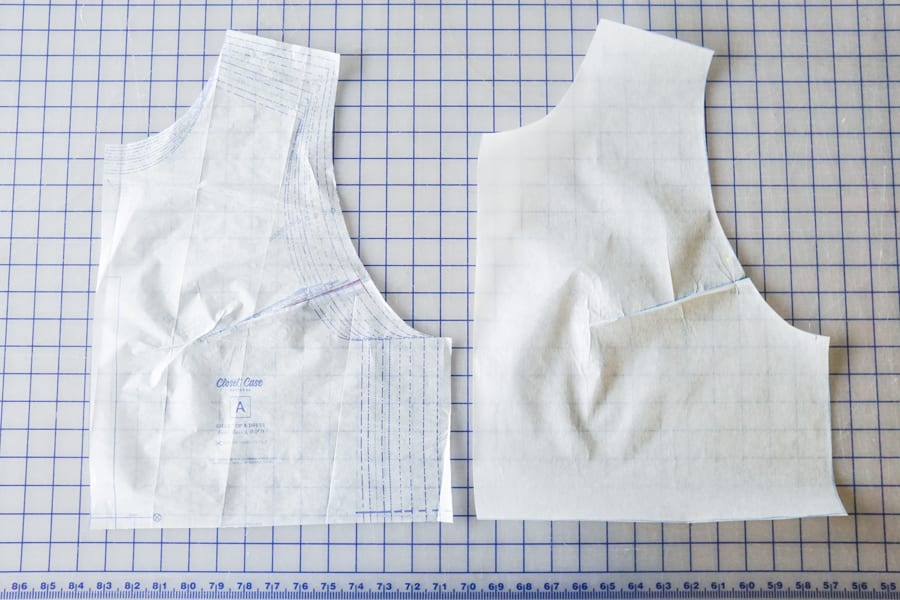
If your dart is small (as for our Cielo top in the 0-20 range) and you just don’t need or want a darted bodice, you can simply remove it.
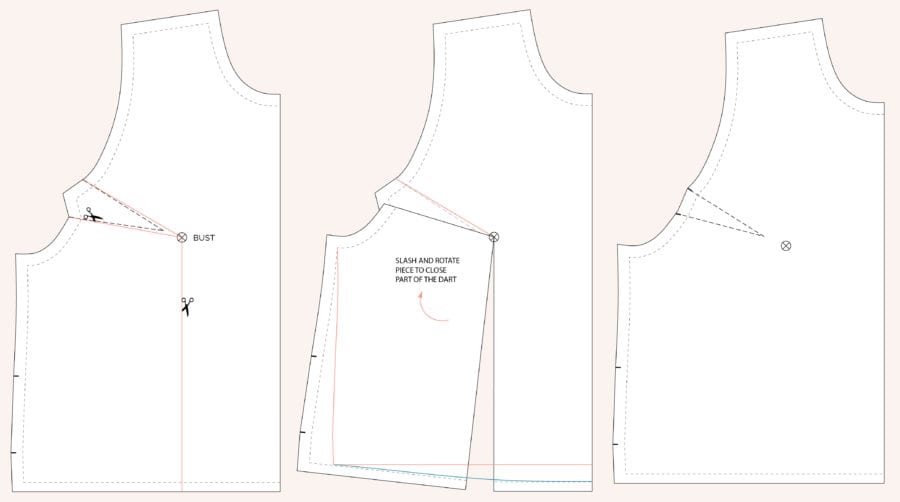
Trace the dart legs that extend to the bust point and another line from apex to hem, parallel to Center Front. Trace your side seam on another piece of paper with the same seam allowance. Cut on the bottom line of the dart and then from hem to apex not going through the apex. Rotate your piece to close the dart entirely. Copy the side seam and trace the new hem.
REMOVING DART AND ADDING FULLNESS
If you want to get rid of that same dart and want to add fullness to your top or dress, you can slash and open your piece and keep the fullness that is created when rotating and closing your dart.
Do the same slash and open to your Back piece and just draw a new hem to both pieces. This creates less volume in the bust but more “swing” to your hem.
IRON IT OUT
If you want to remove a small dart the quick way, you can also just iron it out! We wanted to give this technique a whirl, so we tried it with our pattern tissue as well as Swedish tracing paper. We traced the pattern piece through the paper first.
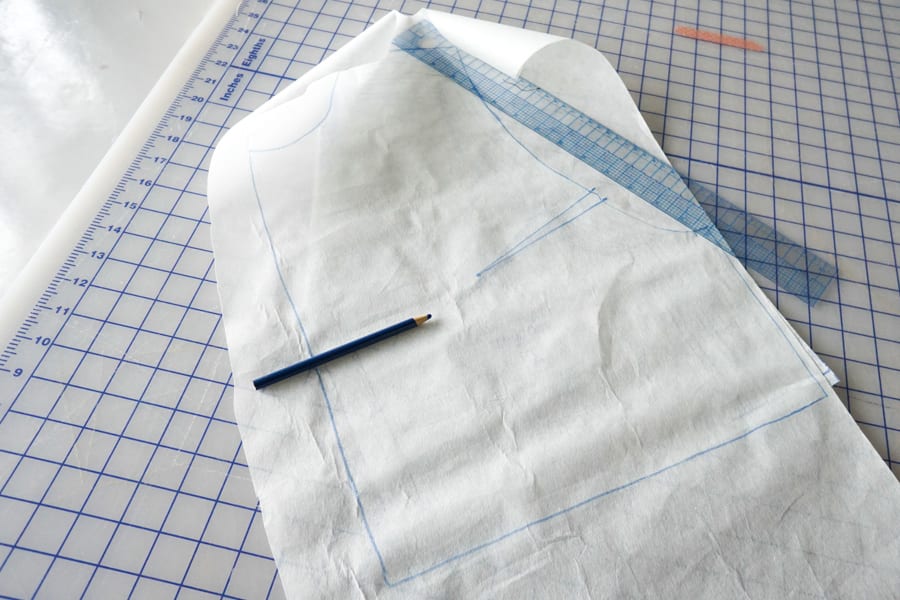
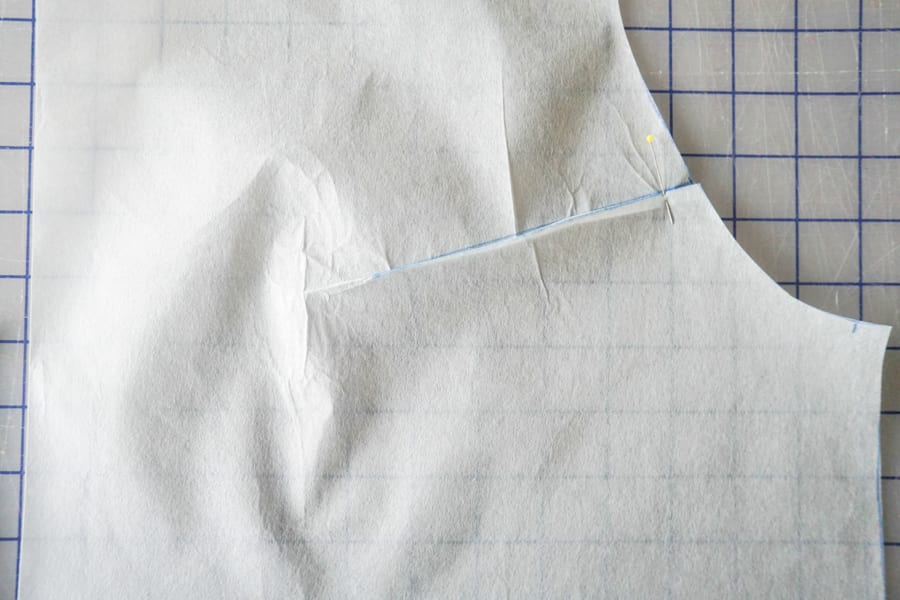
Just fold and pin your dart and iron out the bubble create at the apex.
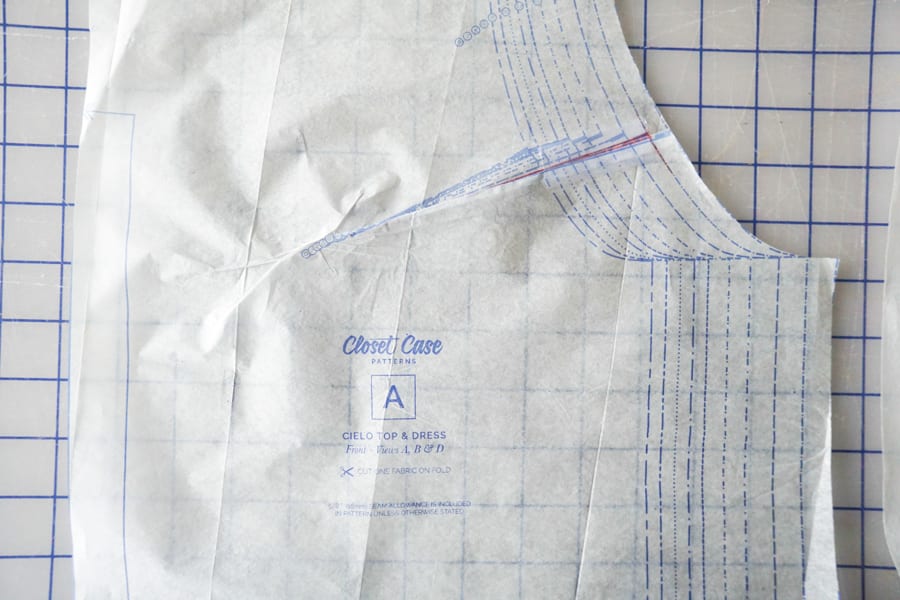
We taped the tissue and used a press cloth to iron it (don’t melt tape all over your iron!) When pinning this pattern piece to the fabric, just be careful to have your Center Front straight and perpendicular to the grainline. Voila! Dart is gone.
For more info on sewing darts we have a blog post about moving them around here, converting them to princess seams here and all the hot tips and techniques for sewing perfect ones here. Go forth and conquer fitting your curves! They deserve it.


